Creating our Network Automation Lab
One of the best ways to learn about a topic is to practice what you study, validate it, and always test your assumptions. In my opinion, there’s nothing that can substitute the hands-on experience you get by configuring and deploying your own network designs.
Nowadays, with the advances in virtualization and containerization, it’s quite simple to set up a lab to help us learn about networking and automation while testing our network designs. Most of the time, you won’t need more than your laptop to simulate a small network and have the chance to break it up as many times as you want without risking an outage.
In this post, we’ll build a lab that can help us to learn more about VXLAN/EVPN while using automation to deploy it with minimal effort. In the lab, we will be using the NVIDIA Cumulus VX boxes for our network gear.
What will we need?
Let’s first define our lab’s requirements to save time when looking for tools to tackle them:
- Use open-source tools.
- We want to quickly share our topology in code to spin up the same lab with minimal effort.
- Use GIT to track any changes in our network topology.
- We want to run the lab without powerful hardware. In this case, I’m using a laptop with 16GB of RAM and a decent CPU.
Vagrant as the winner!
Based on the previous requirements, we will be using a combination of Vagrant and Virtualbox to create and manage our VMs. Vagrant has been chosen as the winner here because it’s straightforward and sharing your topology requires minimal effort. Additionally, free vagrant images (or boxes in the Vagrant terminology) are available for all major network vendors. Lastly, Vagrant and all the tools used in this lab will be open-source.
The cool thing about Vagrant is that it abstracts all the complexity of setting up a VM or even a small network of them (At least for the person who consumes the Vagrantfile). You only need to issue a vagrant up command to build a full topology without doing any work. Another great feature of Vagrant is that your VMs are defined in code, in a regular file, that can be added to version control to track changes to the whole topology. The last advantage is that I can share it with you, and you can replicate the same lab I will be using in the following posts.
Network Topology
At the end of this article, we will have built a Leaf-Spine topology like the following:
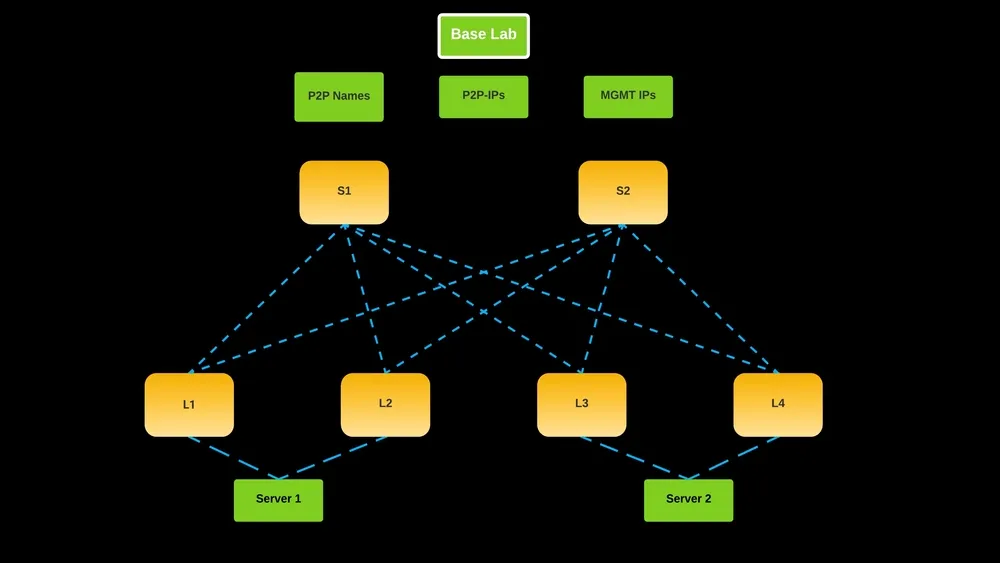 Figure 1 - Base Leaf-Spine Topology
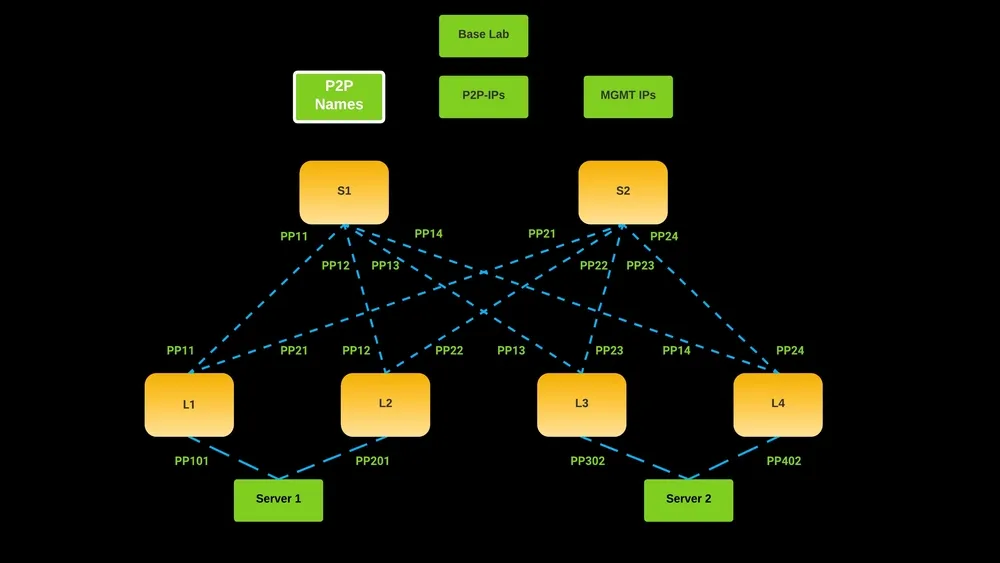 Figure 2 - Leaf-Spine Topology - Point to Point Names
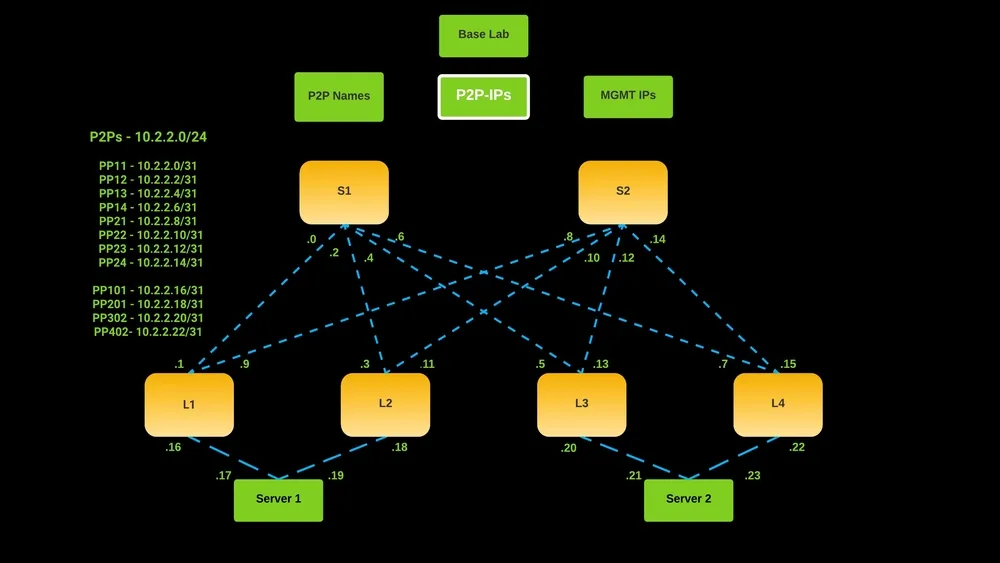 Figure 3 - Leaf-Spine Topology - Point to Point IPs
You can clone the netlab-automation repository and follow the instructions in this post to build a replica of this topology.
Vagrant 101
If you have never worked with Vagrant before, you can read the Vagrant 101 article to find further information on how it works and its components. Otherwise, you can skip it and continue building the lab.
Simulating a Management Network
In Vagrant, I couldn’t find any easy way to bind the eth0 (Management interface for the Cumulus boxes) with a private network, so what we will do to simulate a management network is to create a Private network called “mgmt-network” with the following directive in the Vagrantfile:
1
server02.vm.network "private_network", virtualbox__intnet: "mgmt-network", auto_config: false
In the snippet above, Virtualbox will provision a “Virtual Switch” (In software), and it will attach the “swp1” interfaces of each of the Cumulus VX boxes as well as the Eth1 interfaces of the servers to this switch. Next, you can see the Management network topology:
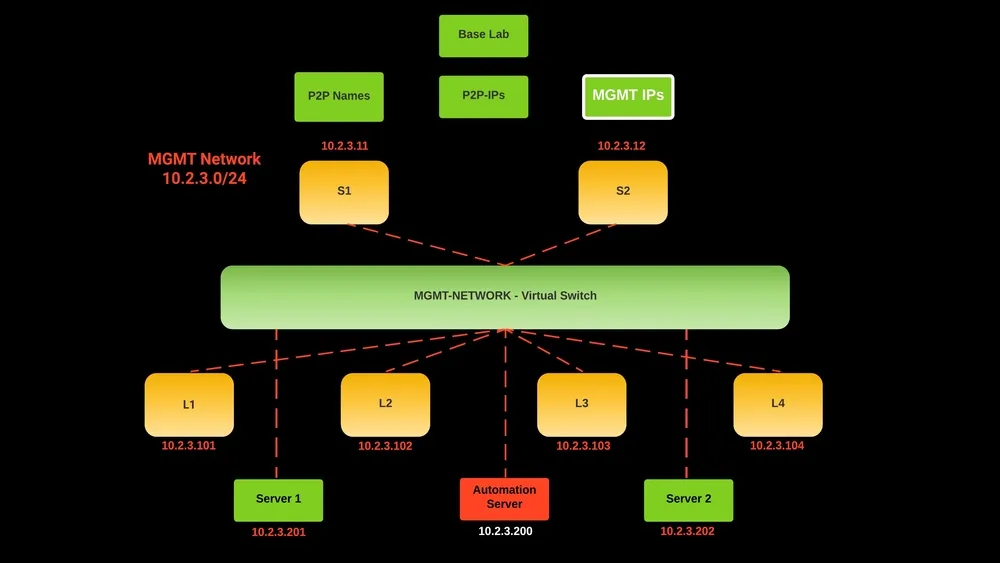 Figure 4 - Leaf-Spine Topology - Management IPs
MGMT VRF: In Cumulus Linux 4.0 and later, a management VRF is enabled by default, and Vagrant attaches the interface eth0 to it for out of band management. In our case, we will additionally connect the first port (swp1), to the mgmt VRF to simulate a management network.
New out of the box config (NOOB)
In this initial stage, we will configure each Cumulus VX and Ubuntu server with shell scripts and, you can find all the scripts in the noob/ directory. In the future, we will create a Zero Touch Provisioning (ZTP) process to address this section more cleanly.
Vagrant will use the shell scripts to configure the management network shown in Figure 4. The following line in the Vagrantfile tells Vagrant to use the shell script to configure leaf01:
1
leaf01.vm.provision "shell", path: "noob/leaf01.sh"
How do we start?
I will be using macOS, but next you can find a guide on how to start from Windows or Linux.
For macOS users
- Install Homebrew
- Install VirtualBox
- Install Vagrant
1
2
3
/bin/bash -c "$(curl -fsSL https://raw.githubusercontent.com/Homebrew/install/master/install.sh)"
brew cask install virtualbox
brew cask install vagrant
For Windows Users
- You must ensure that Hyper-V is not enabled on Windows. Disabling Hyper-V on Windows 10
- Download and Install VirtualBox Download and Install Vagrant
For Linux Users
- Download and Install VirtualBox
- Download and Install Vagrant
Let the fun begin!
After successfully installing VirtualBox and Vagrant, we can clone the repository and run a vagrant up to see the magic in action.
IMPORTANT: If your computer has only 16GB of RAM as mine, you might want to close all other applications before running the lab. Vagrant will take some time to download the image and setup all the VMs in the topology.
1
2
3
git clone https://github.com/danielmacuare/netlab-automation.git
cd netlab-automation/1-cumulus-vxlan-evpn
vagrant up
After the setup process has finished, you can run the following command to check the status of your VMs:
1
vagrant global-status
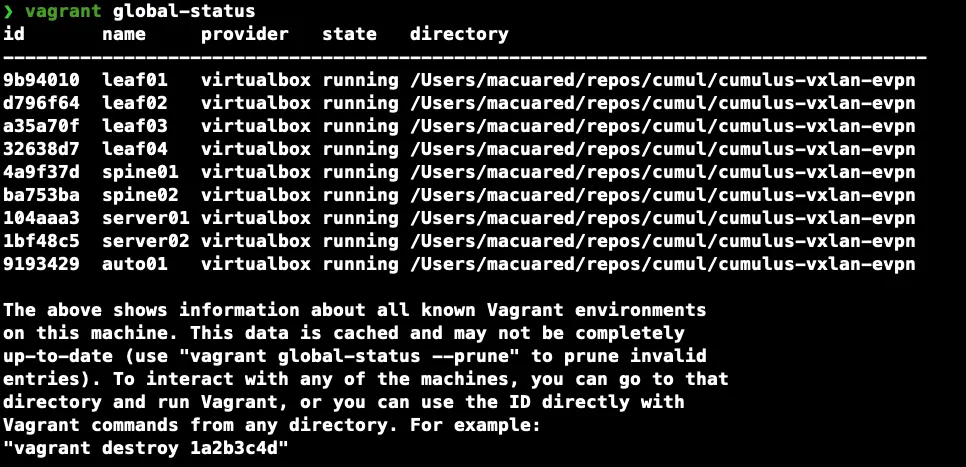 Figure 5 - Vagrant Global Status Output
You can additionally open VirtualBox to check the status of your VMs.
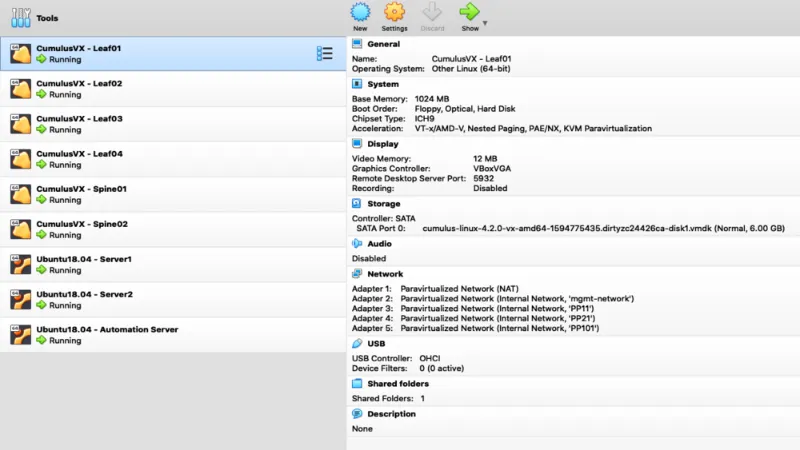 Figure 6 - Virtualbox VMs List
Last, to verify management connectivity, ssh to leaf01, run LLDP (It will take some minutes for LLDP to discover all devices in the mgmt-network), and ping some other devices to ensure they are reachable.
1
2
3
4
5
6
vagrant ssh leaf01
net show lldp
ping -I mgmt 10.2.3.11              # Spine01
ping -I mgmt 10.2.3.102             # Leaf02
ping -I mgmt 10.2.3.200             # Automation Server
ping -I mgmt 10.2.3.201             # Server 1
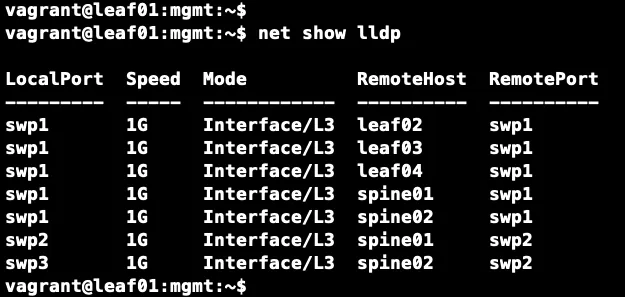 Figure 7 - Show LLDP Command Output
Congratulations, we have finished the lab setup!. In the next posts, we will be adding more features to it and start playing with VXLAN/EVPN.
Recap
In this post, we have configured our lab using a combination of tools like Vagrant, VirtualBox and Cumulus VXs. To get the latest version of this lab go to the netlab-automation repo.
I hope you have enjoyed it as much as I did building this lab.
