Vagrant 101

Vagrant 101
Vagrant is a fantastic tool that will help us to manage our Virtual Machines. You can combine Vagrant with Hypervisors like VirtualBox, VMWare (Not free) or even use libvirt as a provider to use hypervisors like KVM/QUEMU.
With Vagrant, we can find and test Network Operative Systems (NOS) like EOS, JunOS, Cumulus already pre-packaged in VMs, and you can download them without much hassle.
Additionally, with Vagrant, we can define our whole network topology in code and then use version control (GIT comes to mind) to keep track of all the changes.
Vagrant is easy to share and to consume. You only need to have Vagrant installed along with the necessary providers, and you are good to run a network topology in minutes with a single command: vagrant up.
One of the cons about Vagrant, though, is that it requires plenty of resources to run a small-middle lab. The truth is, we are using VMs, which are not overly efficient as they include a full OS to run even a small application.
In general, Vagrant is a good compromise between flexibility and easiness to use. If you require to run big labs, this might not be the best tool for you, but I believe it’s convenient for small labs like our Network Automation Lab (2020 Edition).
Host OS vs Guest OS
From a virtualization perspective, the Host Operative System (OS) is essentially the OS of the computer on which you are installing your hypervisor (VirtualBox in our case). The Guest OS refers to the OS of the machines you create inside the Host OS (Hypervisor). From now on, I will use Hosts and Guest OSs to refer to my PC and VMs, respectively.
Vagrant Components
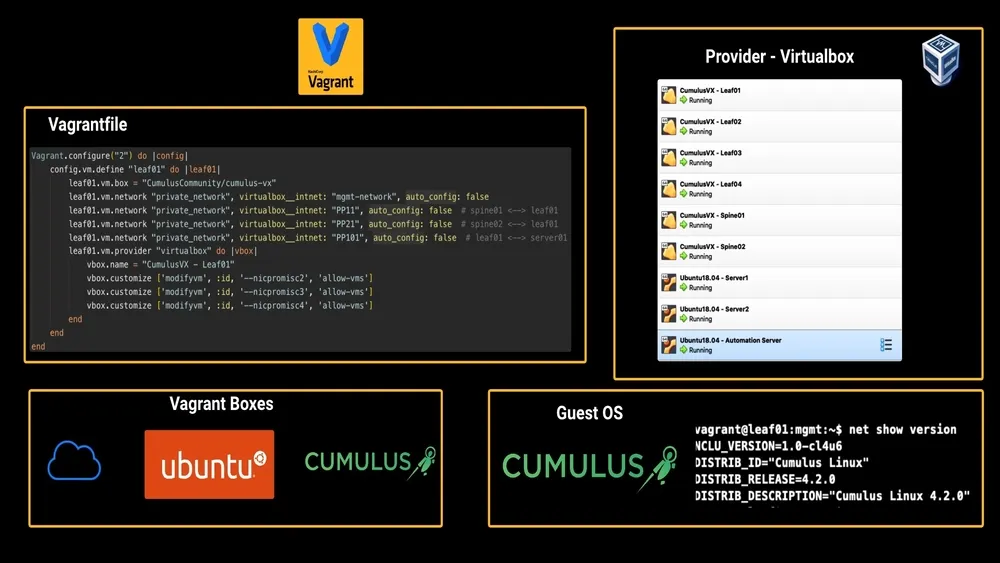 Figure 1 - Vagrant Components
Vagrantfile
The Vagrantfile is the core of Vagrant, which uses it to read your VM definition and configure it in the provider you have chosen. In our case, we’ll be using VirtualBox as our “provider”. In this file, we’ll be defining the configuration of our Virtual Machines (VMs), and Vagrant will be responsible for setting them up in VirtualBox. Vagrant and its Vagrantgfile are written in Ruby, but you don’t need to become a Ruby developer to use this lab or build your own.
Vagrant Providers
In Vagrant’s terminology, a provider is nothing more and than a hypervisor. By default, Vagrant supports hypervisors like VirtualBox and Hyper-v. Vagrant providers are used by Vagrant to extend the capabilities of Vagrant and integrate it with other hypervisors like VMware.
Vagrant Boxes
Vagrant boxes are the images used for our VMs. By default, when you run Vagrant up, Vagrant will check if the image defined in the Vagantfile is already stored in the ~/.vagrant.d/boxes/ directory. If not, it will download it to this folder. If you then create 10 VMs with this image, Vagrant will not have to download it 10 times, so this is quite efficient.
The vagrant box is defined here:
1
2
3
config.vm.define "leaf01" do |leaf01|
    leaf01.vm.box = "CumulusCommunity/cumulus-vx"
end
Next, VirtualBox will create a VM using in our the image stored in ~/.vagrant.d/boxes but Virtualbox will save its own image (uncompressed) at ~/VirtualBox\ VMs, and it will save one image per each VM that you create. You can see the images stored by Virtualbox at ~/VirtualBox\ VMs
The Cumulus VX box we’ll be using in our Network Automation Lab (2020 Edition) occupies about 760 MB of your hard drive. Additionally, Virtualbox will claim around 1.9G per each of the VMs, so be sure to have some space available.
Vagrant VirtualBox NAT
When you are building a VM with Vagrant in VirtualBox, by default, it configures the first NIC (eth0) of each VM as a NAT interface, and it assigns the IP 10.0.2.15. This IP will be the same for every single box you build.
Additionally, Vagrant creates a port forwarding rule to later ssh into the VM when you issue vagrant ssh with a random port in the Host OS. So what happens when you issue vagrant ssh is that Vagrant sends traffic to this random port in the Host OS, and those packets are then redirected to port 22 in the Guest VMs.
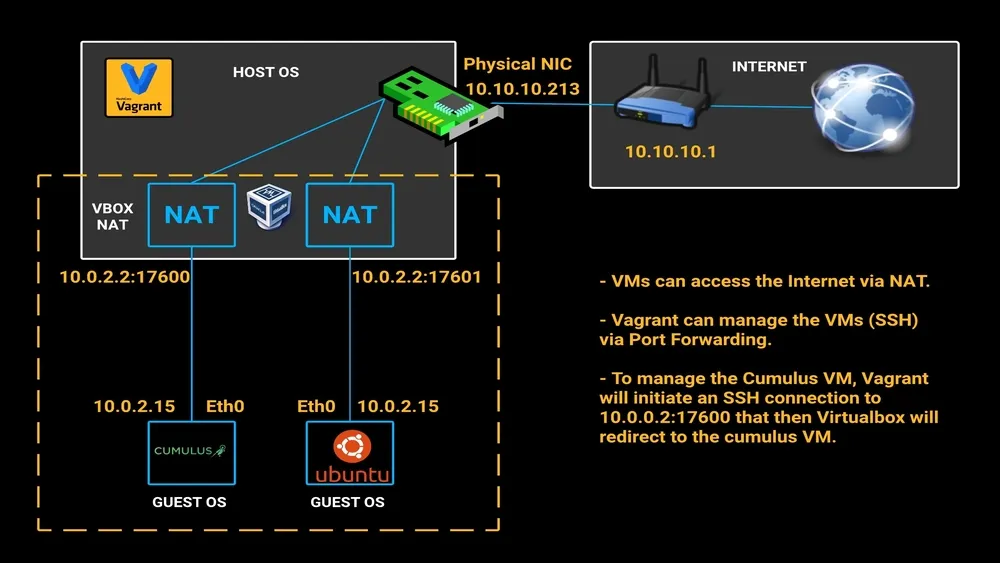 Figure 2 - Virtualbox NAT
Vagrant Useful Commands
1
2
3
4
5
6
7
vagrant up                              # Will start the machines defined in your vagrantfile.
vagrant status                          # Will show you the startus of your VMs.
vagrant global-status                   # Will show you the status of all vagrant environments .
vagrant halt 9aefd11                    # Will save the VMs RAM and will the shut it down.
vagrant reload 9aefd11                  # Will reload the VM and will try to provision it by default.
vagrant destroy                         # Will Delete the files all associated with your box except the vagrantfile
vagrant ssh <box_name>                  # Will ssh to the box
Further Resources
While learning about Vagrant/VirtualBox I found some great resources, so if you want to know more about these topics, be sure to check them out:
- awesome-vagrant Github
- VirtualBox Network explained
- VirtualBox Network settings
- VirtualBox NAT Network config
How to install Vagrant and VirtualBox?
I will be using macOS, but next you can find a guide to help you starting from Windows or Linux.
For macOS users
- Install Homebrew
- Install VirtualBox
- Install Vagrant
1
2
3
/bin/bash -c "$(curl -fsSL https://raw.githubusercontent.com/Homebrew/install/master/install.sh)"
brew cask install virtualbox
brew cask install vagrant
For Windows Users
- You must ensure that Hyper-V is not enabled on Windows. Disabling Hyper-V on Windows 10
- Download and Install VirtualBox Download and Install Vagrant
For Linux Users
- Download and Install VirtualBox
- Download and Install Vagrant
Summary
In this post, we have seen the basics of Vagrant. We are now ready to continue with the Network Automation Lab (2020 Edition), where we will have some fun building a Leaf-Spine topology based on Nvidia Cumulus VX Boxes.