Python Typer: Powerful CLI Apps

Why Typer
Typer is a Python library created to simplify the process of building CLI Apps. Typer was created by Sebastian Ramirez (also creator of the popular Fast API package) and is based on another popular project called click
After playing a bit with Typer, there are a few things I liked about it:
- Native usage of type hints and data validation. This helps prevent bugs in your code and helps users of your tools to work with autocompletion on their IDEs based on the types you have defined in your source code.
- Default help menus are created for your CLI App based on the commands, arguments, and options defined in your code.
- The full option of typer includes rich (to help you format error messages automatically) and shellingham (to help you detect your current shell when installing the auto-completion feature for your CLI app).
- Simple to use yet pretty flexible, it allows you to define commands, arguments, and options. We will see them in the next section.
Typer Basics
In Typer, you can define commands, subcommands, arguments and options to be passed to your CLI app.
Example: python typer-cli.py command subcommand argument –option1 –option2
Command and Sub-Commands (Also known as command-groups): These are the first words you pass to your program after the script name. To create programs with subcommands the recommended way is to create an explicit application
typer.Typer(). We’ll see more of this later.Arguments: Anything to the right of a command or subcommand is technically a parameter (CLI Arguments and CLI options). Each command or subcommand can have its own Argument.
Options: Options can have short names and long names. Additionally, options are passed to commands or arguments.
CLI App Design
In this post, we are going to create a simple CLI App. We will only use print statements to show the functionality of Typer. You can then use this code as a reference to build up more complex examples if necessary.
NOTE: All the code is available in the code-samples/typer-cli repo so you can follow along.
Before writing any line of code, I will start thinking about how I want the users to interact with the CLI app.
Next, we will see the commands that the users will be executing to get all the functionalities of the CLI App:
Discover Command
 Figure 1 - Discover Command
- Discover network devices on a particular subnet
- Discover network devices by providing a name
1
2
3
python main.py discover --help
python main.py discover subnet 10.1.1.0/24
python main.py discover device chi-leaf-04
Add Command
 Figure 2 - Add Command
- Add all discovered devices to Netbox
- Add a single device to Netbox
1
2
3
4
5
python main.py add --help
python main.py add --discovered-devices
python main.py add --single-device chi-leaf-04
python main.py add -d
python main.py add -s chi-leaf-04
Show Command
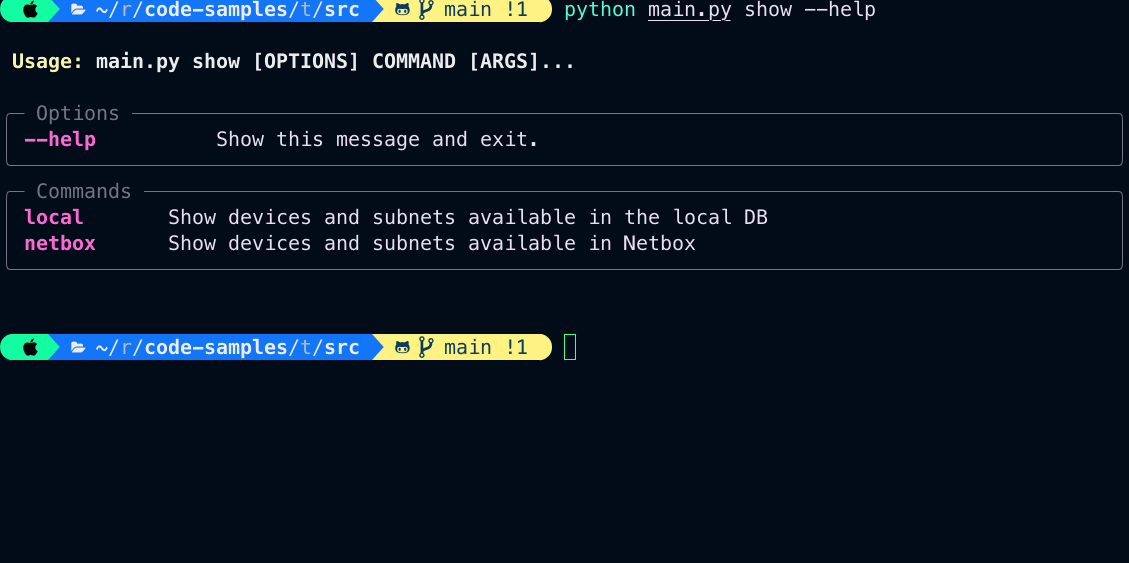 Figure 3 - Show Command
- Show devices and subnets available in Netbox
- Show devices and subnets available in the local DB
1
2
3
4
5
6
7
python main.py show --help
python main.py show netbox --help
python main.py show netbox devices
python main.py show netbox subnets
python main.py show local --help
python main.py show local devices
python main.py show local subnets
Delete Command
 Figure 4 - Delete Command
- Delete all devices available in Netbox
- Delete a single device available in Netbox
- Delete –dry-run option available to prevent errors
1
2
3
4
5
python main.py delete --help
python main.py delete --all-devices --dry-run
python main.py delete --single-device fra-fw-02
python main.py delete -ad
python main.py delete -s fra-fw-02
You can follow along this tutorial
- Clone the repo:
git clone [email protected]:danielmacuare/code-samples.git - Install all the dependencies:
cd typer-cli/- If using poetry:
poetry install - If using pip:
pip -r requirements.txt
- If using poetry:
- Get into the src folder:
cd src/
Creating our CLI App
In this section, we are going to create 5 files, one file for each CLI command and a final file (main.py) that will bind all the commands together.
1 - discover.py: This will discover all the network devices and save them to a local Database.
2 - add.py: This will add all the discovered devices from the local database into Netbox. You can also add a single device out of the DB into Netbox
3 - show.py: This command will show devices and subnets available in Netbox and the local database.
4 - delete.py: will delete --all-devices or a --single-device from Netbox.
5 - main.py: As users, we will be passing the CLI commands, options and, arguments to this file.
Code (Discover Command)
You can check the discover.py file from github if you prefer.
1
2
3
4
5
6
7
8
9
10
11
12
13
14
15
16
17
18
19
20
21
22
23
24
25
26
27
28
29
30
31
32
33
34
#!/usr/bin/env python3

"""
    Discover Command: Used to discover a subnet or a specific device

    Usage:
        python main.py discover --help
        python main.py discover subnet 10.1.1.0/24
        python main.py discover device chi-leaf-04
"""

from typer import Typer, echo

app = Typer(short_help="discover a subnet or a device")


@app.command("subnet")
def discover_subnet(
    subnet: str,
) -> None:
    """Discover devices on a subnet"""
    echo(f"Discovering Devices on subnet: {subnet}")


@app.command("device")
def discover_device(
    device: str,
) -> None:
    """Discover a specific device"""
    echo(f"Discovering Device: {device}")


if __name__ == "__main__":
    app()
Explanation (Discover Command)
app = Typer(short_help="discover a subnet or discover a device"): Will create a Typer instance and will assign it to app variable. This will be similar to all the files we will use to create our commands.- The
short_helpargument will be shown to the user when the--helpoption is used.
- The
@app.command("subnet"): Is a Python decorator. If you are not familiar with this concept, a decorator will add extra functionality to our function defined on line 20.- In this case, we are defining a
subnetsub-command to be used after thediscovercommand. - By default, Typer uses the name of the function below as the subcommand. In our case
discover_subnetwill be transformed todiscover-subnet(Notice the underscore changes to a hyphen) but as defined in the design section we want our sub-command to be calledsubnetinstead. To achieve this with are passing the"subnet"string to the command decorator.
- In this case, we are defining a
- Lines 18-22: Will define our
discover_subnetfunction, its parameters, its types, return value and will print a message for the user. - Line 25-30: Will achieve the same for the
devicesub-command
Code (Add Command)
You can check the add.py file from github if you prefer.
1
2
3
4
5
6
7
8
9
10
11
12
13
14
15
16
17
18
19
20
21
22
23
24
25
26
27
28
29
30
31
32
33
34
35
36
37
38
39
40
41
42
43
#!/usr/bin/env python3

"""
    Add Command: Used to add --discovered-devices or a --single-device to Netbox

    Usage:
        python main.py add --help
        python main.py add --discovered-devices
        python main.py add --single-device chi-leaf-04
        python main.py add -d
        python main.py add -s chi-leaf-04
"""

from typer import Option, Typer, echo

app = Typer(short_help="add --discovered-devices or a --single-device")


@app.callback("add", invoke_without_command=True)
def add_options(
    discovered_devices: bool = Option(
        False,
        "--discovered-devices",
        "-d",
        help="Discovered Devices into netbox",
    ),
    single_device: str = Option(
        None, "--single-device", "-s", help='Choose a scope: "subnet" OR "devices"'
    ),
) -> None:
    """Add Discovered Devices to Netbox or add a static device"""
    if discovered_devices and single_device:
        echo(f'All Discovered devices and: "{single_device}" will be added to Netbox')
        exit()

    if discovered_devices:
        echo("All Discovered devices will be added to Netbox")
    if single_device:
        echo(f'The device: "{single_device}" will be added to Netbox')


if __name__ == "__main__":
    app()
Explanation (Add Command)
@app.callback("add", invoke_without_command=True)- This callback decorator defines the
addcommand and also allows us to use options like--discovered-devicesand--single-deviceafter theaddcommand. I have to say this was a bit confusing and tricky to me but after digging into the issues on the Typer repo, another user suggested this to solve our problem of adding an option to a sub-command. Source
- This callback decorator defines the
- Line 21-26: Defines a Typer Option with an argument called
discovered_devicesthat will then be transformed by Typer to the option--discovered-devices.- The first argument
Falsepassed to the option is the default value for that option. This means that if you pass the option--discovered-deviceto the CLI app, it will set the variable toFalseby default. - The second argument
--discovered-devicesdefines the name of the option. - The third argument
helpdefines the help message that the user will see when executingpython main.py add --help
- The first argument
- Lines 32-39: Print messages to show the user based on the options passed to the CLI APP. No input validation has been performed here as this was out of the scope of this post.
Code (Show Command)
You can check the show.py file from github if you prefer.
1
2
3
4
5
6
7
8
9
10
11
12
13
14
15
16
17
18
19
20
21
22
23
24
25
26
27
28
29
30
31
32
33
34
35
36
37
38
#!/usr/bin/env python3

"""
    Show Command: Used to show devices and subnets available in Netbox or the Local DB

    Usage:
        python main.py show --help
        python main.py show netbox --help
        python main.py show netbox devices
        python main.py show netbox subnets
        python main.py show local --help
        python main.py show local devices
        python main.py show local subnets
"""

from typer import Argument, Typer, echo

app = Typer(short_help='Options: "Local" or "Netbox"')


@app.command("local")
def show_local(
    scope: str = Argument(help='Choose a scope: "subnets" OR "devices"'),
) -> None:
    """Show devices and subnets available in the local DB"""
    echo(f"Show {scope} available in the local Database")


@app.command("netbox")
def show_netbox(
    scope: str = Argument(help='Choose a scope: "subnets" OR "devices"'),
) -> None:
    """Show devices and subnets available in Netbox"""
    echo(f"Show {scope} available in Netbox")


if __name__ == "__main__":
    app()
Explanation (Show Command)
scope: str = Argument(help='Choose a scope: "subnets" OR "devices"'): This line defines a Typer argument and the helpargument- In this case, again, we are not validating any user input so the user could add any other non-defined and non-expected string. One of the ways to solve this problem is to just allow a set of options. By default, I couldn’t find an easy way to achieve this in Typer, this was the closest one I could find Typer-GH-Issue-518. In any case, you could add this validation logic to your function.
Code (Delete Command)
You can check the delete.py file from github if you prefer.
1
2
3
4
5
6
7
8
9
10
11
12
13
14
15
16
17
18
19
20
21
22
23
24
25
26
27
28
29
30
31
32
33
34
35
36
37
38
39
40
41
42
43
44
45
46
47
48
49
50
51
52
53
54
55
56
57
58
#!/usr/bin/env python3

"""
    Delete Command: Used to delete --all-devices or a --single device from Netbox

    Usage:
        python main.py delete --help
        python main.py delete --all-devices --dry-run
        python main.py delete --single-device fra-fw-02
        python main.py delete -ad
        python main.py delete -s fra-fw-02
"""

from typer import Option, Typer, colors, echo, secho

app = Typer(
    short_help="delete --all-devices or a --single-device from Netbox. --dry-run available"
)


@app.callback("delete", invoke_without_command=True)
def delete_options(
    all_devices: bool = Option(
        False,
        "--all-devices",
        "-a",
        help="Delete all devices from Netbox",
    ),
    dry_run: bool = Option(
        False,
        "--dry-run",
        "-d",
        help="(Dry-run) Delete all devices from Netbox",
    ),
    single_device: str = Option(
        None, "--single-device", "-s", help='Choose a scope: "subnet" OR "devices"'
    ),
) -> None:
    """Delete all devices or a single device from Netbox. dry-run available"""
    if dry_run:
        echo("(DRY-RUN): The Devices will NOT be deleted. Ignore the message below:")
        if not all_devices and not single_device:
            secho(
                "ERROR 1: Please use one of the 2 options: --all-devices or --single-device",
                fg=colors.RED,
            )
            exit(1)

    if single_device:
        echo(f'The device: "{single_device}" has been deleted from Netbox')
        exit()

    if all_devices:
        echo("All devices have been deleted from Netbox")


if __name__ == "__main__":
    app()
Explanation (Delete Command)
- Options, decorators have already been explained in the previous commands so in this one we will only focus on the exit function. This function will be exit the program and will return 0 by default which usually means the program exited with no errors. However, you can pass an integer like 1, 2, 3, etc to exit the program when you detect an error. This is the case in line 47 where the user did not pass
--all-devicesor--single-deviceas an option.
Challenges
- Something I found challenging was understanding the use case for the callback decorator. Basically, you can use callbacks when you need to execute extra code before the commands (For example, to validate an input on one of the commands or to globally print a message before executing a CLI command) or when you need to pass options to a sub-command.
- Break out your commands in different had some gotchas but was pretty useful. You can get more information HERE
Closing
I had a great time working with Typer and got to build a few CLIs for some scripts. Although it took me a while to understand how to break out the app in different files, I enjoyed the features it provides and I will be using it more to create some CLI Apps in the future.
Resources
If you want to learn more about this project these are great resources:
- Typer Playlist Youtube - Free it has tons of information and examples.
- Packet Coders - Paid Resource has a session introducing Typer.
- Typer docs are also pretty good.