Ansible roles to deploy Ubuntu servers

If you’ve ever had to manually configure servers one by one, you know how painful it is to maintain consistency across users, groups, SSH keys, Docker, ZSH, editors, and all the other tools you rely on.
In this article, we’ll use Ansible to automate the deployment of 6 Ubuntu servers with identical configurations and tooling.
Use cases
This week I needed to build 10 Ubuntu VMs to deploy new services in my lab.
My motivations to automate this deployment were:
- Keep a consistent environment between all my servers that will match the tools I use on my local machine.
- Save time by not having to manually configure all these VMs myself
- Have my code in version control to add more features in the future with minimal risk.
- Reduce the time it takes me to rebuild one of those VMs in the future.
Beyond my specific scenario, this approach is valuable for:
- Homelab enthusiasts who want to quickly rebuild or add new servers with preferred tooling already configured
- Network engineers testing automation tools like containerlab, infrahub, netbox, or nautobot who need fresh environments regularly
- DevOps teams managing development servers where everyone needs the same shell, editor, and CLI tools
- Certification prep (CCNA, CCNP, CKA, etc.) where you need consistent lab environments you can tear down and rebuild quickly
- Training and workshops where all participants need identical setups
Project overview
All the code shown in this example lives in the dmac-ansible repo, where you’ll find detailed documentation and additional guidance.
This repo currently provides 5 main roles:
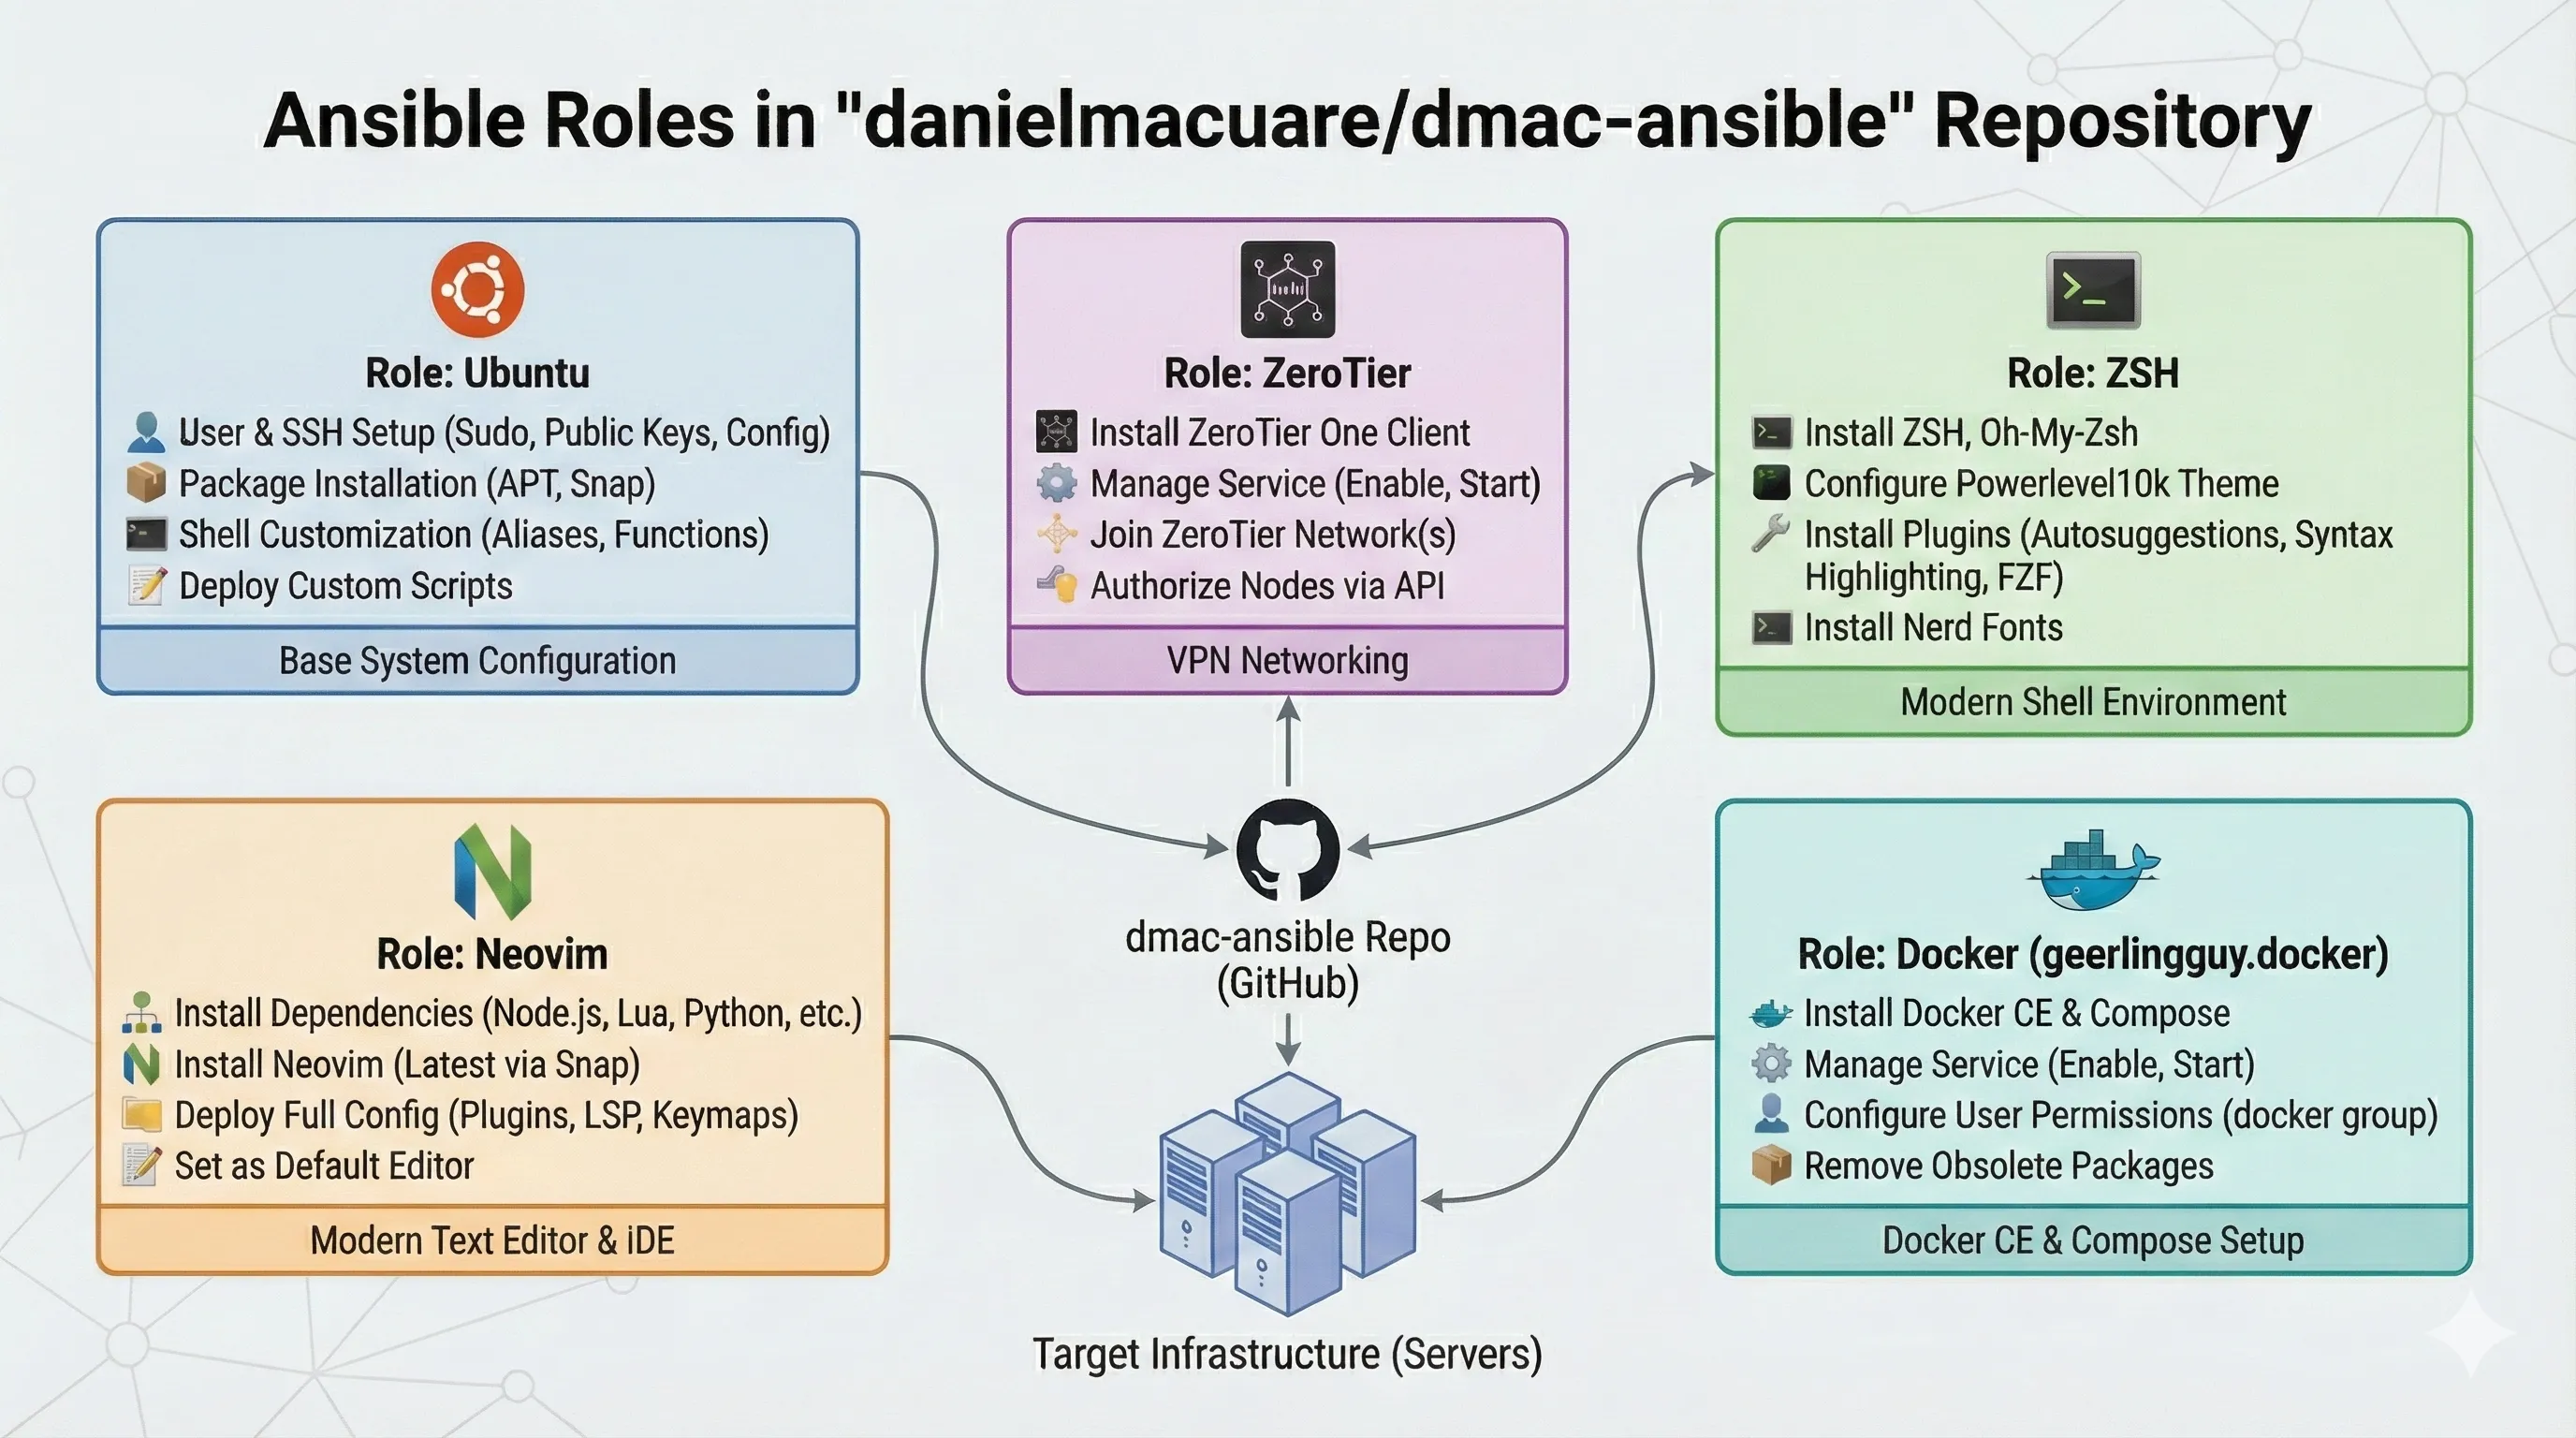 Figure 1 - Ansible Project Roles
- ubuntu - The base role that creates users, groups, SSH keys, and installs APT and Snap packages.
- zerotier - Installs ZeroTier and joins your specified network.
- zsh - Installs ZSH with Oh-My-Zsh and the Powerlevel10k theme, plus useful plugins like fzf-tab and zsh-autosuggestions.
- docker - Installs Docker CE, Docker Compose, and manages Docker users. Huge thanks to Jeff Geerling for maintaining this excellent role.
- neovim - Installs Neovim with Lazy as the plugin manager and Mason for LSP management, along with additional plugins for a great editing experience.
Note: Only use the neovim role if you want to deploy a custom configuration. If you just need neovim installed, add it to the
apt_packageslist in the ubuntu role instead.
Getting started
We’ll use Ansible to configure the servers once they’re created and reachable via SSH.
We will divide this goal in 3 main tasks:
- Create 6 VMs to test our playbook.
- Clone the repository and update the inventory, vars, playbook, and other necessary files.
- Configure all 6 servers in a single Ansible run.
1 - Creating the VMs
For this step, I’m using Orbstack since I’m on MacOS. Check out the Orbstack Installation Docs if you need to install it.
Alternative options:
- Windows: Use WSL2 or VirtualBox
- Linux: KVM or LXC work great
Once Orbstack is installed, create the 6 VMs:
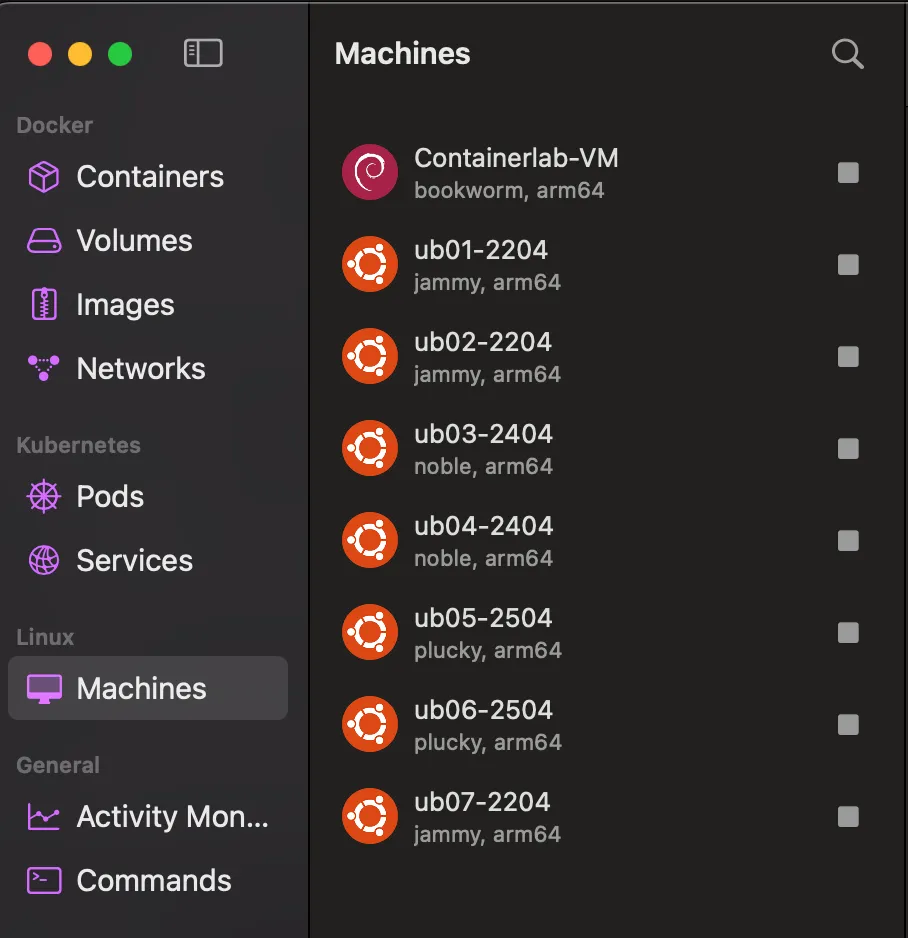 Figure 2 - 6 x Ubuntu VMs
2 - Cloning the repo and updating files
2.1 - Clone and install dependencies
1
2
3
4
git clone https://github.com/danielmacuare/dmac-ansible.git
cd dmac-ansible
uv sync
uv run ansible-galaxy install -r requirements.yml -p ./roles
2.2 - Customize your deployment
For a detailed step-by-step guide on updating all necessary files before running the playbook, check out the Configuration Guide
You’ll need to modify these files:
- vars.yaml - Stores all variables used by each role. This controls how your servers are configured.
- vault.yaml - Stores the password for encrypting/decrypting sensitive Ansible files containing secrets.
- inventory.ini - Defines which targets are available in each Ansible group.
- ubuntu.yml - Controls which roles get applied to target servers. Mix and match as needed. The ubuntu role (base) is recommended; all others are optional.
- dmac.pub - Your SSH public key. The filename should match the username configured in
vars.yaml.
2.2.1 - Example configuration
Here’s what my configuration looks like:
1
2
3
4
5
6
7
8
9
10
11
12
13
14
15
16
17
18
19
20
21
22
23
24
25
26
27
28
29
30
31
32
33
34
35
36
37
38
39
40
41
42
43
44
45
46
47
48
49
50
51
52
53
54
55
56
57
58
59
60
61
62
63
64
65
66
67
68
69
70
71
72
73
74
75
76
77
78
79
80
81
82
83
84
85
86
87
88
89
90
91
92
93
94
95
96
97
98
99
100
101
102
103
104
105
106
107
108
109
110
111
112
113
114
---
# UBUNTU ROLE
auth_key_dir: ""

users:
  - username: dmac
    sudo_access: true
    ssh_access: true
    ssh_pub_key: ""
    ssh_pass: ""
    custom_alias_file: "aliases_dmac.j2"
    custom_functions_file: "functions_dmac.j2"
  - username: svmt
    sudo_access: true
    ssh_access: true
    ssh_pub_key: ""
    ssh_pass: ""
    custom_alias_file: "aliases_svmt.j2"
    custom_functions_file: "functions_svmt.j2"

apt_packages:
  - whois
  - sshpass
  - nmap
  - bat
  - ripgrep
  - zoxide
  - jq
  - fzf
  - tldr
  - duf
  - btop
  - tree
  - tcpdump
  - openssh-server # ORB VMs won't install it by default

snap_packages:
  - name: rustscan # NMAP Faster Alternative
    classic: false
    version: "latest/stable"
  - name: termshark # Wireshark-like TUI
    classic: false
    version: "latest/stable"


# ZEROTIER ROLE
zerotier_api_accesstoken: ""
zerotier_api_url: "https://api.zerotier.com/api/v1"
zerotier_network_id: "83048a0632608eee"

# ZSH ROLE
zsh_users:
  - username: dmac
    oh_my_zsh:
      theme: "powerlevel10k/powerlevel10k"
      plugins:
        - git
      update_mode: auto
      update_frequency: 5
      write_zshrc: true

zsh_p10k_users:
  - dmac

zsh_plugins:
  - "zsh-autosuggestions"
  - "zsh-fast-syntax-highlighting"
  - "fzf-tab"
  - "zsh-completions"

zsh_plugins_path: "/.oh-my-zsh/custom/plugins"

# DOCKER ROLE
docker_edition: 'ce'
docker_packages:
  - "docker-"
  - "docker--cli"
  - "docker--rootless-extras"
  - "containerd.io"
  - docker-buildx-plugin
docker_packages_state: present
docker_obsolete_packages:
  - docker
  - docker.io
  - docker-engine
  - docker-doc
  - docker-compose
  - docker-compose-v2
  - podman-docker
  - containerd
  - runc

# Docker Compose Plugin options.
docker_install_compose_plugin: true
docker_compose_package: docker-compose-plugin
docker_compose_package_state: present

# Docker Compose options.
docker_install_compose: false # Prevents legacy binary
docker_compose_version: "v2.40.3" # Latest as of 11/2025
docker_compose_path: /usr/local/bin/docker-compose

# A list of users who will be added to the docker group.
docker_users:
  - dmac
  - svmt


# NEOVIM ROLE
neovim_set_default_editor: true
neovim_deploy_config: true
neovim_users:
  - username: dmac
1
2
3
4
5
6
7
8
9
10
11
12
13
14
[all:vars]
ansible_user=dmac
ansible_python_interpreter=/usr/bin/python3

[ubuntu_hosts]
ub01-2204 ansible_host=ub01-2204@orb ansible_user=ub01-2204 zerotier_hosted_on=orb-ub01-2204
ub02-2204 ansible_host=ub02-2204@orb ansible_user=ub02-2204 zerotier_hosted_on=orb-ub02-2204
ub03-2404 ansible_host=ub03-2404@orb ansible_user=ub03-2404 zerotier_hosted_on=orb-ub03-2404
ub04-2404 ansible_host=ub04-2404@orb ansible_user=ub04-2404 zerotier_hosted_on=orb-ub04-2404
ub05-2504 ansible_host=ub05-2504@orb ansible_user=ub05-2504 zerotier_hosted_on=orb-ub05-2504
ub06-2504 ansible_host=ub06-2504@orb ansible_user=ub06-2504 zerotier_hosted_on=orb-ub06-2504

[proxmox]
max ansible_host=max-01
1
2
ssh-ed25519 AAAAC3NzaC1lZDI1NTE5AAAAILLLdt13LmYyZmOn4bwbgVctSuejlc7iPAE46s9KlePs
1
2
3
4
5
6
# Example File - FAKE CREDS
vault_auth_dir_key: "/etc/ssh/authorized_keys"
vault_zerotier_api_accesstoken: "Put your Zero Tier API Token HERE"
# See docs/password-generation.md for instructions on how to generate the password hashes below
vault_dmac_ssh_pass: "$6$Vqo2MXAAQt6z0KxG$2/XYsLfVbnLRhMveU9YV2lwzxnTRD8gk3jnjKWc894lApaFlJHhAo/m.FV/pqbD3EXV26Iia9otiiKBKTmXDCS"
vault_svmt_ssh_pass: "$6$U4CbBz7gOuK11hjd$YOtOM6s5ftzqRDr408qsXDnyRBJ4a/lQLFufb1LJM1Q7R9ATcG/CvkybfJhRpaSDb5Z1GdEwsJIvZhyCnnADEX"
- Playbook
1
2
3
4
5
6
7
8
9
10
---
- name: Configure Ubuntu Development Servers
  hosts: ubuntu_hosts
  gather_facts: true
  roles:
    - { role: ubuntu, tags: ["ubuntu"] }
    - { role: zsh, tags: ["zsh"] }
    - { role: geerlingguy.docker, tags: ["docker"], become: true }
    - { role: zerotier, tags: ["zerotier"] }
    - { role: neovim, tags: ["neovim"] }
3 - Running the Playbook
Once you’ve updated all the variables and files, it’s time to execute the playbook:
1
2
3
4
5
6
7
8
# Run all roles
uv run ansible-playbook playbooks/ubuntu.yml -K

# Or run specific roles only
uv run ansible-playbook playbooks/ubuntu.yml -K --tags ubuntu
uv run ansible-playbook playbooks/ubuntu.yml -K --tags zerotier
uv run ansible-playbook playbooks/ubuntu.yml -K --tags zsh
uv run ansible-playbook playbooks/ubuntu.yml -K --tags docker
I had to run the playbook twice since it froze halfway through on the first attempt. This was likely due to my machine (hosting Orbstack and all 6 VMs) only having 16GB of RAM.
3.1 - Results
After running the playbook, all 6 servers were successfully configured. Here’s what the deployment looks like:
 Figure 3 - Ansible playbook completed successfully on the second attempt
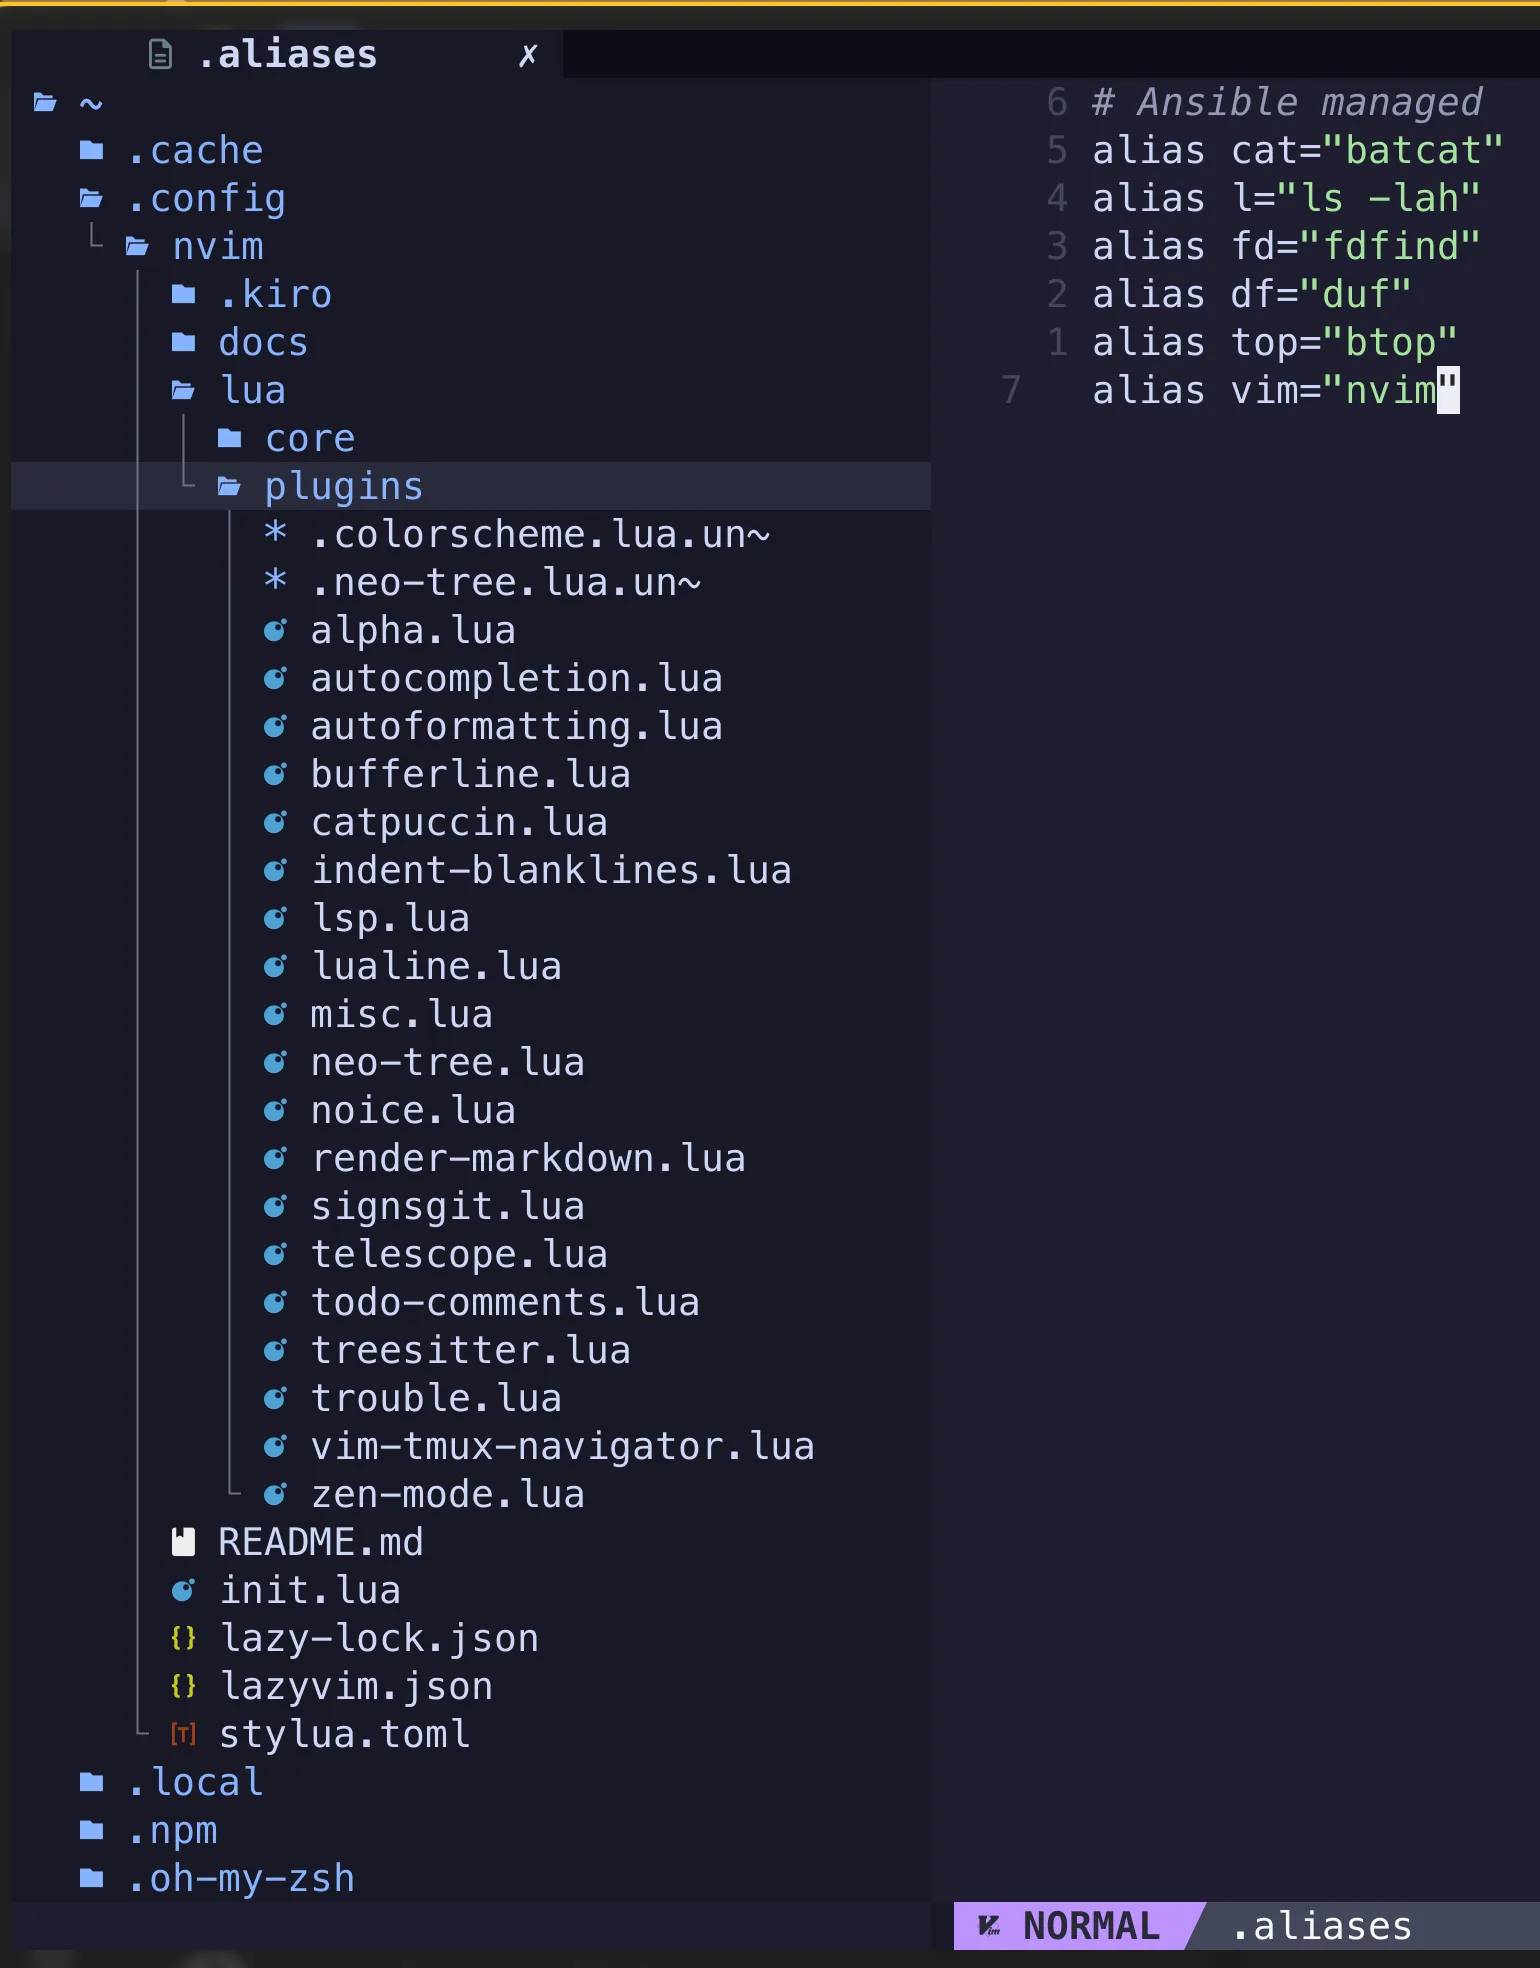 Figure 4 - Neovim installed and configured with all plugins
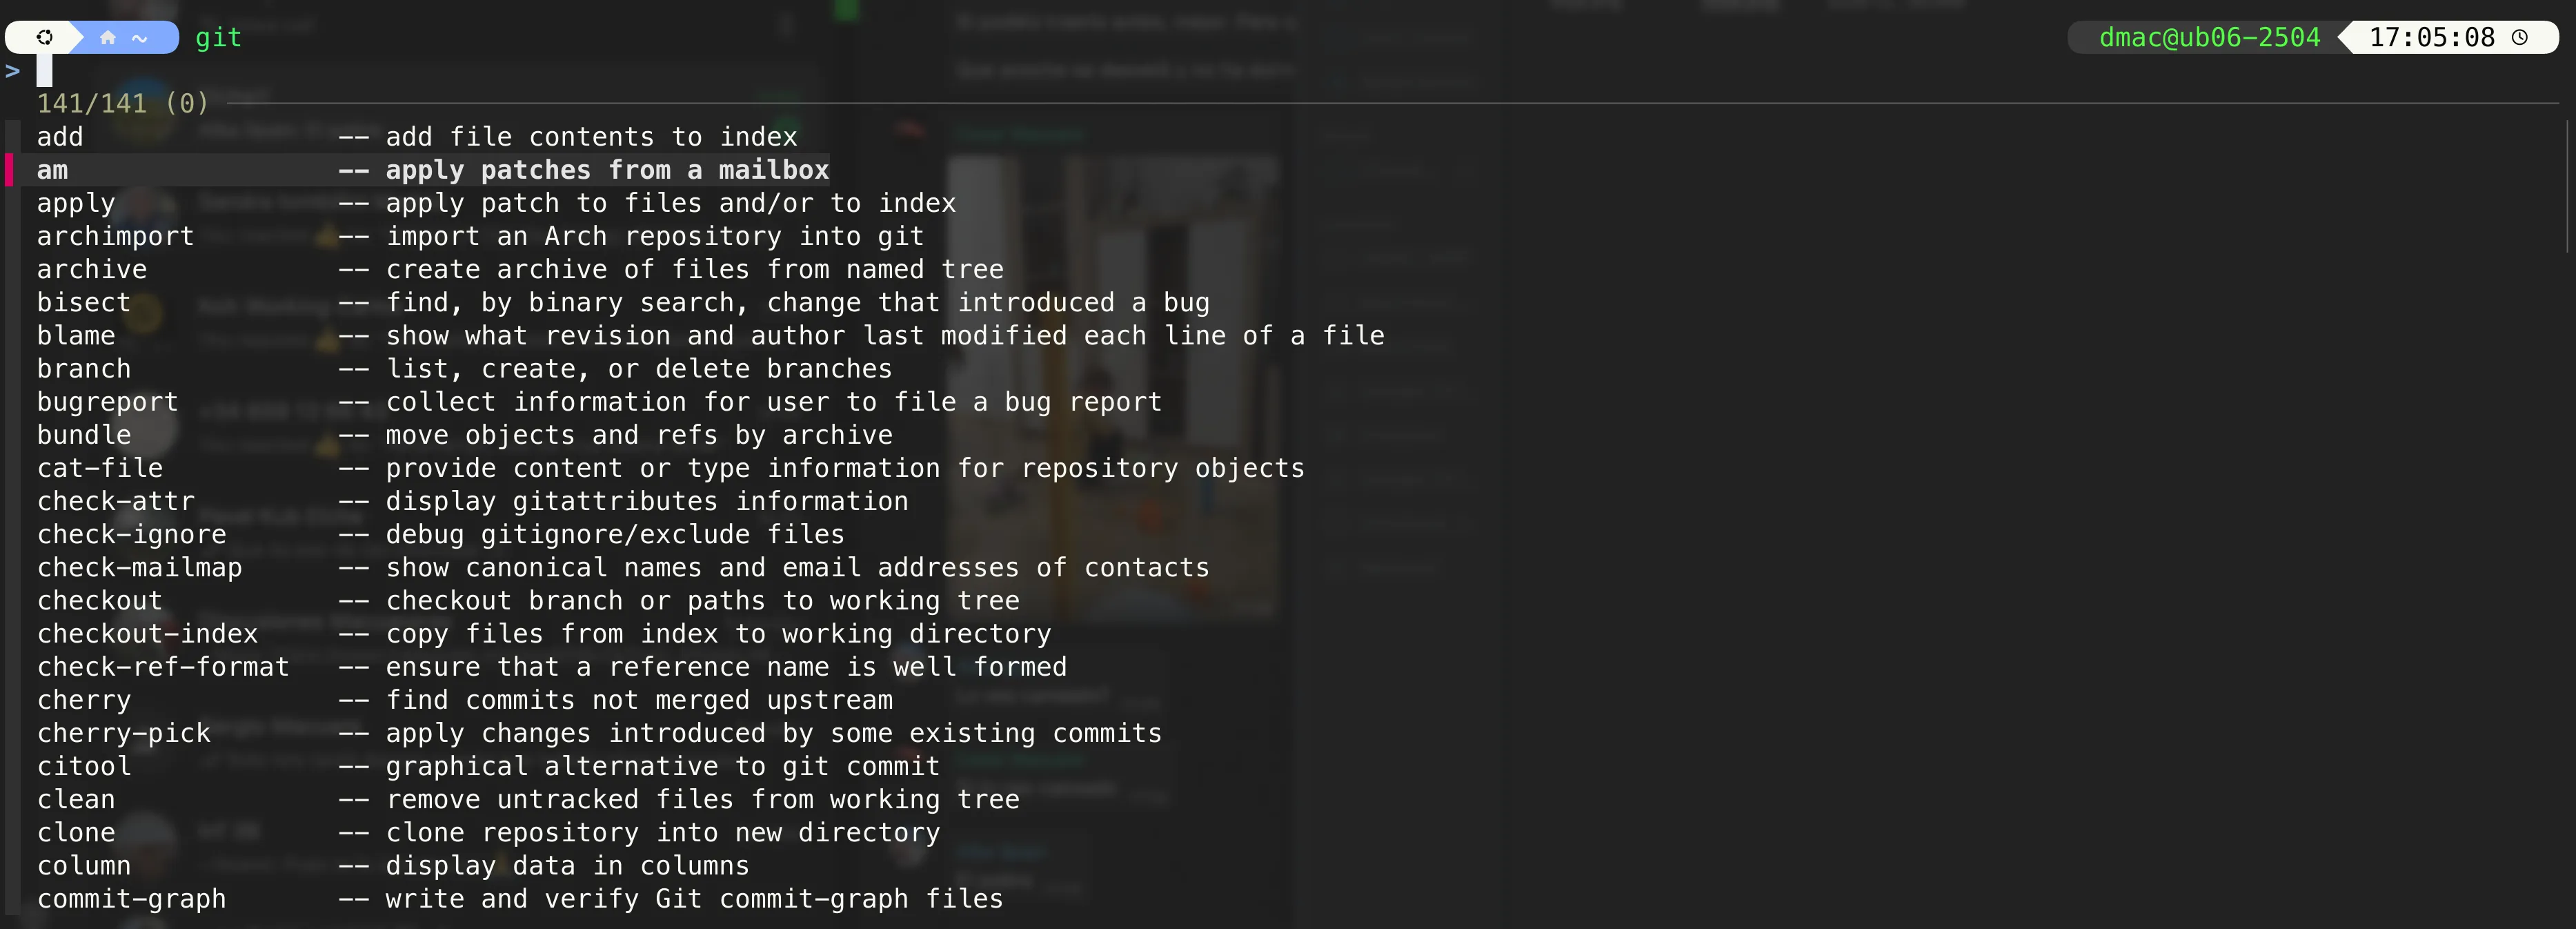 Figure 5 - ZSH installed with useful plugins like fzf-tab
 Figure 6 - ZeroTier installed and connected
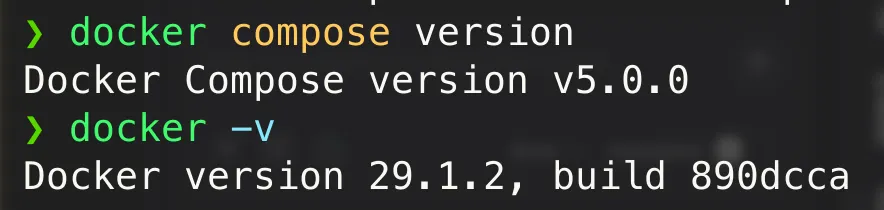 Figure 7 - Docker and Docker Compose installed
Closing thoughts
The modularity of these roles allows us to create different playbooks to target different sets of servers. For example:
1 - Ubuntu base playbook
- Ubuntu role: To only apply the base ubuntu config (Users, groups, SSH Keys, etc)
2 - Ubuntu + Docker Playbook
3 - Ubuntu + Docker + Tools + Remote Access
- Ubuntu role
- Docker role
- Tools
- ZSH
- Neovim
- Zerotier role
After completing this automation we can now:
- Replace VMs effortlessly: If one VM dies or gets too annoying we can quickly create a new one and configure it with the playbook.
- Get a consistent set of tools and the same experience across all our servers.
- Save time when creating new servers.
If you’re managing more than a couple of servers or frequently spinning up new VMs for testing, I highly recommend giving this approach a try. The initial setup takes some time, but once you have your vars and inventory configured, deploying new servers becomes almost effortless.
Feel free to fork the dmac-ansible repo and adapt it to your needs. I’d love to hear if there are any improvements you’d suggest!